Với những bước hướng dẫn đơn giản hi vọng ngay sau khi đọc bạn có thể biết cách thiết kế giao diện web bằng PHP và MySQL. Nhưng trước khi làm được bạn phải có nền tảng về HTML, CSS và biết cách sử dụng các trình soạn thảo như Notepad++, Subline text…
Hướng dẫn tạo giao diện web bằng PHP, MySQL kết hợp Bootstrap
Sau đây là các bước hướng dẫn viết web bằng php bạn nên làm theo thứ tự hướng dẫn ở trong bài nhé!
I/ Xây dựng bố cục giao diện Front end
Bước 1: Xây dựng cây thư mục
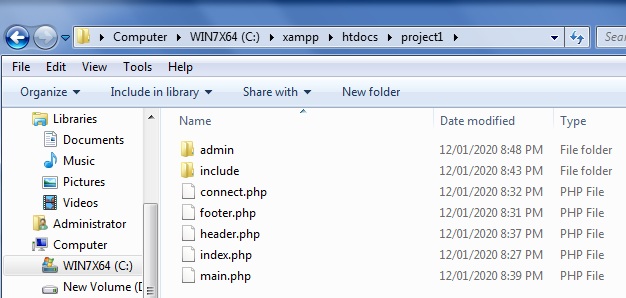
Trong thư mục htdocs (C:\xampp\htdocs\) bạn sẽ tạo một thư mục tên là project1 để chứa toàn bộ file bên dưới
Qua hình trên bạn sẽ thấy công việc tiếp theo là sẽ tạo ra các tập tin bao gồm:
- index.php : Hiển thị trang chủ PHP
- header.php: Hiển thị phần đầu trang web
- main.php : Chứa danh sách bài viết và phần sidebar
- article.php: hiển thị nội dung bài viết
- url_seo.php: Tạo đường dẫn thân thiện
- footer.php : Hiển thị nội dung chân trang
- connect.php : Kết nối tới CSDL Database
Bước 2: Viết code cho từng page

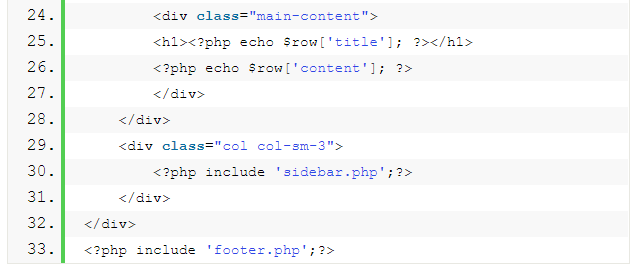
Trong index nó sẽ gọi 3 tập tên ra đó là header.php, main.php và footer.php
.png)
.png)
.png)
.png)
Code single.php
– Tiếp theo tạo 1 file là single.php để hiện nội dung bài viết chi tiết khi nhấp chuột và
.png)

Code file seo_friendly.php
<?php
require 'connect.php';
$query = mysqli_query($conn, "SELECT *
                              FROM posts WHERE url = '' ");

while($row = mysqli_fetch_assoc($query)){

    $new_friendly_url = $vl_url_string = friendly_seo_string($row['title']);

    $counter = 1;
    $intial_friendly_url = $new_friendly_url;

    while(mysqli_num_rows(mysqli_query($conn, "SELECT *
                                               FROM posts
                                               WHERE url = '$new_friendly_url' "))){

        $counter++;

        $new_friendly_url = "{$intial_friendly_url}-{$counter}";
        }

    mysqli_query($conn, "UPDATE posts
                         SET url = '{$new_friendly_url}'
                         WHERE id = '{$row['id']}' ");

    }

function friendly_seo_string($vp_string){

    $vp_string = trim($vp_string);

    $vp_string = html_entity_decode($vp_string);

    $vp_string = strip_tags($vp_string);

    $vp_string = strtolower($vp_string);

    $vp_string = preg_replace('~[^ a-z0-9_.]~', ' ', $vp_string);

    $vp_string = preg_replace('~ ~', '-', $vp_string);

    $vp_string = preg_replace('~-+~', '-', $vp_string);

    return $vp_string;
    }

?>
Code sidebar.php
<?php require_once 'header.php'?>

<div class="container">

<div class="row">

<div class="col-sm-8">
<?php
include 'connect.php';
if(isset($_REQUEST['url']) and $_REQUEST['url']!=""){
$url=$_GET['url'];
$sql = "SELECT * FROM posts WHERE url = '$url' ";
$result = mysqli_query($conn, $sql);
while ($row = mysqli_fetch_array($result)) {
echo "<img src='admin/photo/$row[image]' width='100%'/>";
echo "
<h2>".$row['title']."</h2>

";
echo "

".$row['content']."

";
}
}
?>
</div>


<div class="col-sm-4">
<?php require_once 'sidebar.php'?>
</div>

</div>

<!-- /.Row-->
</div>

<!-- /.Container-->
<?php require_once 'footer.php'?>
File .htaccess
để tạo đường dẫn thân thiện với SEO
RewriteEngine on
RewriteRule ^post/(.*).html$ ./single.php?url=$1
Code footer.php
<div class="jumbotron">

<div class="appeal">
        </div>


<h2>Copyright @ 2020 Design by Quách Quỳnh</h2>

</div>

</div>

<!--/. Container-->
</div>

</div>

</body>
</html>
Code file connect.php
<?php $conn = mysqli_connect("localhost", "root", "", "data"); mysqli_set_charset($conn, 'UTF8'); ?>Code file style.css
(Nằm trong thư mục include/css)
* { margin: 0; padding: 0; } body { font-family: Arial; } .jumbotron { margin: 0!important; } .header { width: 100%; height: 50px; background-color:#23384e; position: relative; margin-bottom: 10px; box-shadow: 0 0 15px rgba(0,0,0,0.6); padding-top: 10px; } .header img { float: left; position: absolute; left: 0; margin-left: 5px; } .header input { background: #fff; border: 0 none; color: #807E7E; height: 38px; line-height: 26px; font-size: 14px; margin: 0 0 0 12px; outline: medium none; padding: 6px 14px; width: 500px; border-radius: 2px; box-shadow: 0 0 1px rgba(0,0,0,0.6); font-family: inherit; float: right; margin-right: 5px; } .navbar-header { width: 100%; height: 30px; padding: 10px 0; } .navbar-header li { display: inline-block; float: left; margin-right: 20px; padding: 5px; } .navbar-header li a { color: #ffffff; text-decoration: none; } .main { width: 100%; } .col-sm-8 {padding: 0!important; } div.baiviet{ } .baiviet { overflow: auto; box-shadow: 0 0 5px #000; padding: 10px; border: 1px solid green; } .baiviet a { text-decoration: none; } .baiviet img{ width: 50%; height: 200px; float: left; margin: 0 20px 20px 0; } .baiviet h1 { display: inline; line-height: 32px; font-size: 25px; } .baiviet p { line-height: 32px; font-size: 16px; margin-bottom: 20px; } .col-sm-4 { margin: 0!important; } .col-sm-4 img {height:182px} .baivietmoi { } .baivietmoi img { float: left; margin: 0 10px 10px 0; width: 100px; height: 90px; clear: both; box-shadow: 0 0 5px #000; } .baivietmoi h1 { font-size: 18px; } .register { width:100%; } .register input { width: 100%; margin-bottom: 10px; height: 20px; padding: 15px; } .chapters{ width: 100%; } .jumbotron { position: relative; } .jumbotron .appeal { font-size: 17px; background: #1ebba3; color: #fff; width: 100%; } .jumbotron h2 { position: absolute; top: 100px; } .posts { clear: both; }Ok như vậy là đã xong phần Front-end rồi!
II/ Xây dựng phần backend để thêm dữ liệu là bài viết
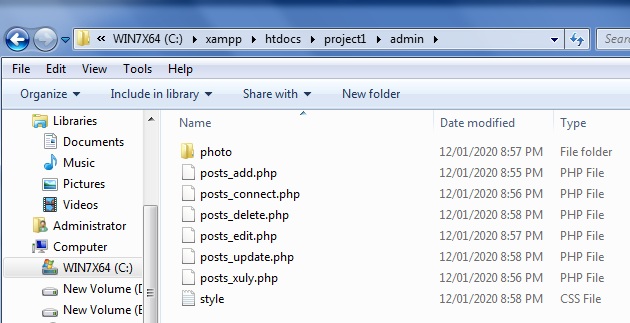
Bước 1: Trước tiên bạn sẽ tạo thư mục admin như trong hình để làm trang admin bằng php
Bước 2: Tạo trang thêm bài viết trong PHP (Nhấp vào liên kết để đọc)
Bước 3: Truy cập vào liên kết localhost/project1/admin/posts_add.php để thêm bài viết
Cuối cùng load lại địa chỉ localhost/project1/ để xem thành quả nhé!
Trên đây là bài viết hướng dẫn tạo website tin tức bằng PHP và Bootstrap. Hi vọng qua bài viết này sau khi đọc xong bạn có thể tự tạo cho mình website với PHP.


